Last Updated: 18th November 2024
Applies to:
- Solar Installer users
- Enterprise users
What You Need To Do:
After the opportunity has been created click on the Solar technology tab in the top navigation bar.
Note: If the proposal is shared be sure to un-share to enable editing.
Note: Before you start, make sure you are within an opportunity (not on the home screen). If you're not sure how to create an opportunity, check out our article: Creating a proposal - Start to Finish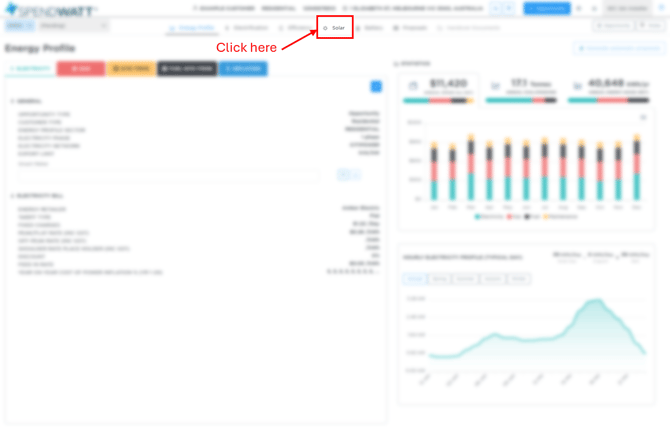
- If the opportunity was automatically generated see the below steps - if not, jump to step 2.
- Delete the automatically generated solar panel area by using the bin tool.
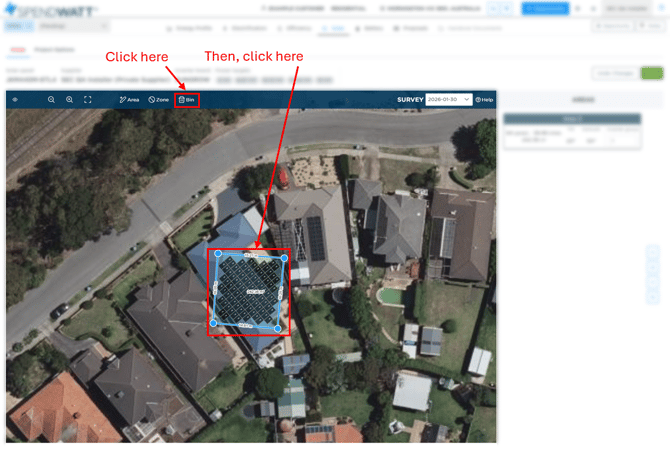
- Enter full screen mode and zoom in on the area of the home or business you want to install solar on.
- Using the + Area tool start by outlining the different facets of the roof (or ground area if ground mount)

Important note: The azimuth is auto-generated in alignment to the longest edge of the shape drawn. So make sure you always start by making the longest edge aligned to the direction you want the panels to slope.
Pro Tip 1: For roof's where the azimuth is not aligned to the longest edge, force the azimuth / panels to auto point in the right direction by making the longest edge the way you want the panels facing and close the shape i.e. you can achieve this by making a small triangle (even though it's not following the roof exactly yet) - then pull out the shape corners and click on the lines to add additional dots to then make it follow the roof as you like - at least this way the panels are facing the right direction and you don't need to manually play with the numeric input in the properties box - this is a massive time saver as it saves you needing to manually play with the azimuth numbers in the property box.
E.g. below showing the panels facing the wrong direction due to the longest edge not being the bottom of that roof area.
E.g. below - showing the user of the pro tip and how you can force the panels to face the right way in 3 simple steps:- Draw a small triangle making the longest edget the bottom of the roof area,
- Click on any of the lines to add a dot and drag to next roof edge,
- Add more dots and drag out to all edges of the roof to complete.

- For each area you draw there is a properties box which is visible when you click on a given panel within an array (make sure you don't have any tool selected before clicking on a panel). Here is where you let the software know about the properties of this group of selected panels.
The below shows i) the area was named, ii) the layout type was changed to Brick and iii) the panels dragged across and area dots re-aligned with the roof edges to sit the panels in the center of the roof.
Note: At this point the aim is not to design how many panels you want on the roof but to show the software what can fit. This later enables the software to help you see the economics of different size options so you can pick the best option/s aligned to your customers needs and your business.
Below is an example of this roof completed including an exclusion zone added using the Zone tool.
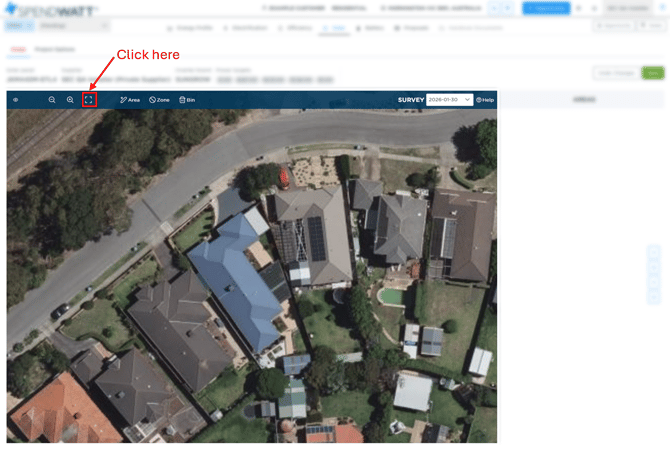
- Once you have finished making the areas you need and setting their properties appropriately, exit the full screen mode and click Save.
The next page that loads shows you the resulting project options.  From here you can add one or more options to the customer proposal by clicking the Add button as seen below. You can also remove any options that have been added by clicking the Remove button.
Important!
Following is some typical actions proficient users of the software frequently leverage to get the exact proposals they are after. If you plan on selling solar power with this software you will need to familiarise yourself with the below:
-
- How to edit of the pricing and control what quote line items the customer sees in your solar proposals.
Recommended Article: How to Use the Budgets (Overview) - Set the proposal options to either indicative (Customer call to action = 'Request Consultation') or non-indicative (Customer call to action = 'Accept and Sign Proposal).
Recommended Article: Indicative and Non Indicative Proposals - Create different solar power sizes using power targets.
Recommended Article: Create Different Solar Size Options - See how to change the inverter from what was auto selected.
Recommended Article: Change the solar inverter - Easily add solar options with different products that you may wish to offer the customer.
Recommended Article: Create Solar Options With Different Products
- How to edit of the pricing and control what quote line items the customer sees in your solar proposals.
Once you have added one or more options into the proposal you can view them by clicking on the Proposal button in the top navigation bar.
Congratulations! You’ve created a solar proposal!
- How to Add Solar Layouts In Proposals
- Customer Proposal (Overview)
- Creating a Battery Proposal (Overview)
- Creating a Building Electrification Proposal (Overview)
- Creating an EV Charger Proposal (Overview)
- Creating a Vehicle Electrification Proposal (Overview)